
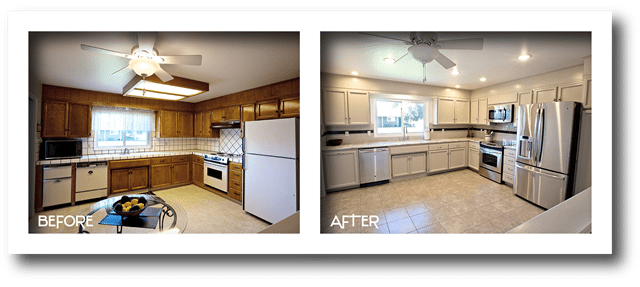
By far, Rick and Debby’s 1977 kitchen classic is the most eye-popping transformation to date. These homeowners might still be “Stuck in Lodi Again” (thank you, CCR!) but their kitchen is no longer stuck in the ’70s.
We think that we hit a home run with this kitchen, but don’t just take our word for it. Read on to hear verbatim what this homeowner experienced, and then scroll down to see before and after kitchen renovation pictures.
The Homeowner’s Experience
The kitchenCRATE team asked Mr. & Mrs. Wilmot (the homeowners) a few questions regarding their experience. Here’s what they said:
What was your favorite part of the kitchenCRATE process?
The kitchenCRATE process is unique and obviously very well thought out. After seeing an ad in a local business magazine my husband and I went straight to their website. It was very informative regarding the company’s history and how they have developed a concept in the renovation that is both time and cost effective. The time-lapse photos showing the work progress on other kitchens was so cool! We figured if kitchenCRATE could make that much of a difference with kitchens a lot younger, our groovy 1977 pad would surely be far out! From our first meeting with CEO Scott Monday until the last workman left our home, we were never out of the loop. If you want a beautiful kitchen without growing old in the process, or breaking the bank, contacting kitchenCRATE will be the best decision you could make.
What was your favorite part about the kitchenCRATE team?
We can’t say enough about how great kitchenCRATE was to work with. The whole crew treated us and our home with such respect you would’ve thought they were long lost cousins and uncles! Any design idea we proposed was thoughtfully considered, yet they were also experts and were honest enough to tell us what would work and what wouldn’t. We were impressed with their attention to detail and personal enthusiasm in seeing the project unfold correctly and on time. Any work crew that eats lunch outside, cleans up at the end of every day and brings their own porta-potty is a winner in our book!
Was there anything about the process or project that surprised you? If so, what was it?
The key foundation in planning the finished look of our kitchen was the choice of granite. We were surprised that the CEO would actually meet with us at the facility in Hayward and help us find just what we wanted. Believe me, there were hundreds of choices and we could easily have been confused on our own. Scott assisted us in staying on track within our color concept and also our budget. If you want professional, personal guidance in shaping the kitchen of your dreams, go to kitchenCRATE!
Day by Day Progress
Here’s how we did it:
Day 1 – Demo Day! On this first day, we set up plastic walls to protect the home from dust, protected the entire floor with building paper, and then went to town removing the appliances, countertop, backsplash, cabinet doors, and drawers. This is also when we removed the enormous light box in order to make room for LED can-lighting. Toward the end of the day, we created the template for the new granite countertops, which take a few days to fabricate off-site. Lastly, we removed the old linoleum flooring, in order to make room for the Travertine tiles.
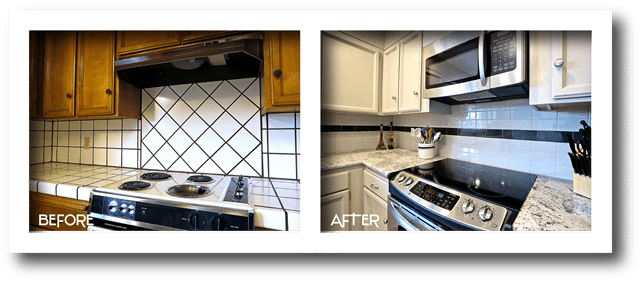
Day 2 – Now that the surface-mounted light box was removed, craftsman were able to go to work installing the pattern-specific LED can lighting. 5″ accent and 6″ primary can lighting was placed strategically around the kitchen to allow for optimal light placement. A hood bracket above the range was also modified to hold the new above-stove microwave-hood combination.
Day 3 – Since all the walls and the ceilings are protected, our painters began preparing and priming the cabinets. Using a high-grade oil-based primer, every inch of the cabinet exteriors and interiors were caulked, sanded and primed. This is the first (and perhaps most critical) step of creating a durable paint finish.
Day 4 – The painters then applied two coats of Kelly-Moore Dura-poxy paint in Earthstone to the thoroughly sanded, primed cabinets. This same priming and painting process was used on the doors and drawers, which are painted off-site in a climate-controlled paint booth for the highest possible quality.
Day 5 – The capable team at AAI Granite & Tile arrived to install the beautiful Kohler Brookfield undermounted sink in Biscuit and the MSI Juparana Delicatus granite countertops with a bull-nose edge. This polished granite with natural undertones and dark flecks match perfectly with Earthstone cabinet color.
Day 6 – As an add-on feature, AAI got to work laying the Bedrosians Tilecrest Verona travertine tile floors in Taupe. We added a couple extra days to the standard 7-day process to add these beautiful floors to this home.
Day 7 – AAI Granite & Tile was back on-site, this time to install the 3 × 6 Daltile Urban Putty Subway tile with gloss finish and accented with a 3 x 6 Bedrosians glass tile in Brown. The harmony between the beige gloss cream tile and the glass brown subway tile is perfection. During this time, AAI also completed the travertine tile floors.
Day 8 – AAI Granite & Tile returned one last time to add Laticrete Antique White grout to the backsplash. Straight after the grout was left to dry, painters got to work painting the entire kitchen, including the ceiling in Kelly-Moore Campiello.
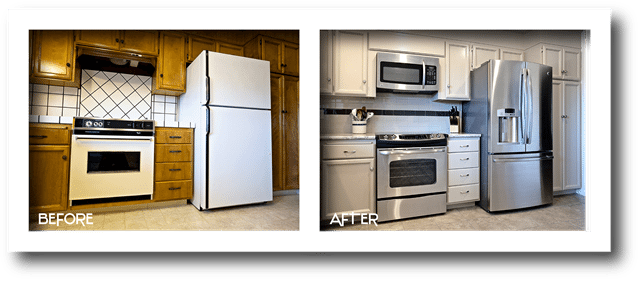
Day 9 – Lastly, the kitchenCRATE team installed the homeowner’s new stainless steel Frigidaire appliances. The transformation then hit the home stretch with the installation of the freshly-painted cabinet doors and drawers. The final day of the project included an array of “touch-up” items: all outlets and switches were replaced in an almond color, the Kohler faucet was installed and the entire project was cleaned, top-to-bottom.
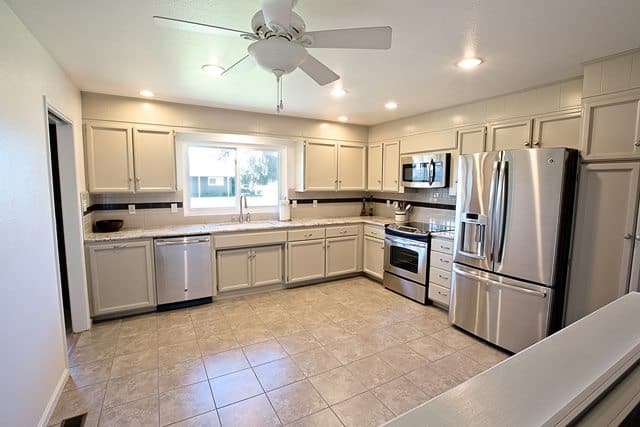
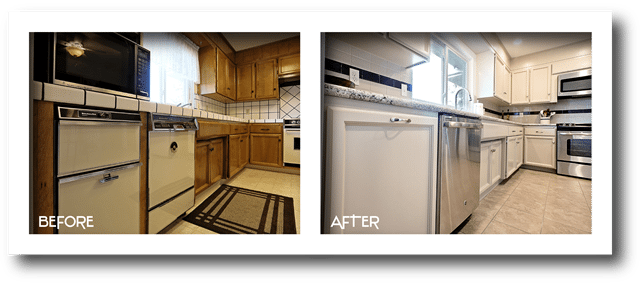
Before and After Kitchen Renovation Photos

Technical Kitchen Renovation Details
Countertop: MSI: Juparana Delicatus
Cabinet Finish: Kelly-Moore Earthstone finish using top-of-the-line Kelly-Moore Dura-Poxy paint and primer.
Backsplash: 3 × 6 Daltile Urban Putty Subway tile
Accent Backsplash: 3 x 6 Bedrosians glass tile in Brown.
Grout: Laticrete Antique White
Sink: Kohler Brookfield in Biscuit
Floors: Bedrosians Tilecrest Verona tile floors in Taupe
Wall Paint: Kelly-Moore Campiello
Is Your Kitchen Ready for a Kitchen Renovation? Contact Us Today!
Perhaps the Gateway Circle kitchen reminds you of your kitchen. Are you are ready for a completely new look and feel in your kitchen? Contact us today and we can make it happen in just a few days and for an amazingly low price.
Just click here to schedule your phone consultation using our on-line scheduling system. Feel free to call us direct during business hours at 888-995-7996!

